April Showers Bring May Flowers - Rainbow!
Hello!
I've wanted to try this technique since The Nail Buff first posted it. http://thenailbuff.blogspot.com/2011/11/opi-lincoln-park-after-dark-with.html. Apparently so do about 500 other people. This manicure, was like a phenomena on Pinterest getting about 500 re-pins in 24 hrs. My most re-pinned image for sure. So, I knew I wanted to use it for one of these challenges and I thought ahead to make my rainbows like this. I also put up a tutorial, click under the "tutorials" tab on my main page :)
 ZOYA rainbow!! Red - America, Orange - Lianne, Yellow - Creamy, Green - Midori, Blue - Yummy, Indigo - Ibiza, Violet - Zara


I'm experimenting with back ground...do you prefer the dark back ground, or the lighter one?


 I couldn't be happier with how this turned out!! It's exactly how I pictured it in my head :) I cut down on the pics soooo much. There were for sure a zillion, ok, well, 25 that I wanted to post!
Here's the challenge that I've been working on and this was clearly #5, A rainbow after the storm.

Here are the links to the other ladies who have finished their rainbow!
http://diypolish.blogspot.com/2012/04/spring-challenge-day-5-rainbow-after.html
- http://charlottes-nails.blogspot.co.uk/2012/04/april-showers-challenge-rainbow-after.html
- http://mandyspolish.blogspot.com/2012/04/asbmf-5-rainbow-after-rain.html
- http://onenailtoanother.blogspot.ca/2012/04/asbmf-rainbow-after-rain.html
- http://creativenaildesignbysue.blogspot.com/2012/04/asbmf-challenge-5-rainbowfuzzy-that-is.html
- http://polished-prisms.blogspot.com/2012/04/asbmf-5-rainbow-after-rain.html
- http://footballandfingernails.blogspot.com/2012/04/april-showers-challenge-rainbow-after.html
- http://karinea0a.blogspot.com/2012/04/asbmf-5-rainbow-after-rain.html
Thanks for reading!! Have a good night :)
~Victoria
I've wanted to try this technique since The Nail Buff first posted it. http://thenailbuff.blogspot.com/2011/11/opi-lincoln-park-after-dark-with.html. Apparently so do about 500 other people. This manicure, was like a phenomena on Pinterest getting about 500 re-pins in 24 hrs. My most re-pinned image for sure. So, I knew I wanted to use it for one of these challenges and I thought ahead to make my rainbows like this. I also put up a tutorial, click under the "tutorials" tab on my main page :)
This method works by actually letting your polish (already dispensed on a plastic plate) get sticky and stringy! It was a lot of work and needed a lot of clean up, but oh man! I adore the end result!!
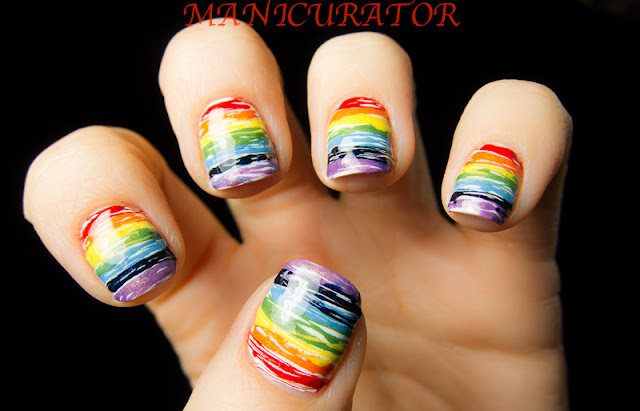 I started with base coat of one coat of Milani High Speed Fast Dry in White on the Spot. I don't think this is really so fast drying at all, but it is a nice one coat white.


Here are a few photos of the finished manicure BEFORE the top coat went on. I think it looks totally cool this way, but I knew it would get ruined if I didn't put Seche Vite, fast dry top coat on it! And even with the fast dry...this took a loooong time to dry.


The following photos are with top coat. Two coats actually.

I'm experimenting with back ground...do you prefer the dark back ground, or the lighter one?


Again, dark background or lighter one?


Here's the challenge that I've been working on and this was clearly #5, A rainbow after the storm.
Here are the links to the other ladies who have finished their rainbow!
http://diypolish.blogspot.com/2012/04/spring-challenge-day-5-rainbow-after.html
- http://charlottes-nails.blogspot.co.uk/2012/04/april-showers-challenge-rainbow-after.html
- http://mandyspolish.blogspot.com/2012/04/asbmf-5-rainbow-after-rain.html
- http://onenailtoanother.blogspot.ca/2012/04/asbmf-rainbow-after-rain.html
- http://creativenaildesignbysue.blogspot.com/2012/04/asbmf-challenge-5-rainbowfuzzy-that-is.html
- http://polished-prisms.blogspot.com/2012/04/asbmf-5-rainbow-after-rain.html
- http://footballandfingernails.blogspot.com/2012/04/april-showers-challenge-rainbow-after.html
- http://karinea0a.blogspot.com/2012/04/asbmf-5-rainbow-after-rain.html
Thanks for reading!! Have a good night :)
~Victoria


Omg omg omg I LOVE IT!!!
ReplyDeleteThanks Heidi :)
DeleteI'm dying. This is so friggin cute. Tutorial plleeeaaase! And I didn't even notice the background- the mani took all my focus!
ReplyDeleteThank you so much Rachael! Tutorial is up, just check in the tab at the top. Hope it helps! :)
DeleteAMAZING!! I just love this so much!!
ReplyDeleteThanks sweetie! xoxoxo
DeleteWow, your rainbow looks awesome! I love the texture without topcoat! For the rainbow-mani I think the black background makes the colors pop more, but as Rachael wrote, it's so pretty you don't really notice while looking at your pictures ;)
ReplyDeleteI finished my rainbow too, btw.
Thanks Kayono! I did see your rainbow, commented on it too :) I liked the texture too, I just knew it wouldn't dry and I'd ruin it when I slept!
Deleteomg thats absolutly stunning!!!!
ReplyDeleteThank you Ashley!
DeleteHoly smokes! This is so gorgeous! Can't wait to see the tutorial!
ReplyDelete- Sara
Thank you Sara! Tutorial is up! :)
DeleteThis is amazing. I LOVE it. I like the darker background.
ReplyDeleteThank you Amoki!I like the dark better too :)
DeleteI lovee it pleaase I cant wait for your tutorial post lol
ReplyDeleteand I like the black background better :)
Thanks so much Karine! It's uuuup!
DeleteI was just thinking of trying this method out yesterday! Now that I've seen your gorgeous results it's a must!
ReplyDeleteThanks Jessica! Good luck with yours. Can't wait to see it :)
Deletepure awesomeness! this is not easy to do - you must have had the patience of a saint to do a rainbow with it. Stunning result, stunning xx
ReplyDeleteThank you so much Debbie!! Yea...I got the patience for sure :D
DeleteLove love love this!!!
ReplyDeleteThank you Sarah!
DeleteThanks everyone, I appreciate all your comments!! I made sure I was following all of you :D
ReplyDeleteLove it. I'm a new follower (found this mani - lol) I can't wait to see the tut.
ReplyDeletehttp://nailsit.blogspot.com
Hi, thanks :) I was already following you on FB, just followed your blog too! The tutorial is up!! Check the tab.
DeleteThis is a cool technique!! I can't wait to see the tutorial and try it! Your rainbows are fabulous and I think I like the lighter backgrounds better. :D
ReplyDeleteThanks Angie! The tutorial is in the tab at the top of page, did you see it?
Deletethis is fantastic! and i like the lighter background.
ReplyDeleteThank you :))
DeleteTHIS IS EPIC! Love it!
ReplyDeleteSo cool, thank you Tini!
DeleteThanks so much :)
ReplyDeleteThis is absolutely gorgeous!! I am signed up for Pinterest but have no idea what to do next-maybe you could help me? All I want is my pics to post on Pinterest to get more traffic to my blog. If you'd be so inclined, maybe you can use my contact form on my blog and tell me how??? I'd be forever grateful!!
ReplyDeleteThanks! Just wrote to you :)
DeleteI just awarded you with the Versatile blogger award. Check it out at http://avidlian.blogspot.com
ReplyDeleteCongrats
Thank you so much!! Means a lot to me :D
DeleteI HAVE TO TRY THIS! Awesomeness! LOVE IT
ReplyDeleteThank you, good luck!
Deletethis is awesome! i have to attempt this :)
ReplyDeletenew follower! la la love your blog.
Thanks so much! Happy to have you! Can't wait to see how yours turns out :)
DeleteOne of the pictures of this manicure has been cropped (watermark removed) and has been blogged ane reblogged a TON over on tumblr. I saw it and was all "I've seen that before!"
ReplyDeleteThis is freaking amazing! I am soooo going to try this!
ReplyDeleteHi, Victoria! Your manicure is awesome and it's a real pitty that somebody stoled it from you, because this is what it is: a robbery! Yes, putting the watermark in the center of the photo and partly on your nails is not so nice but sometimes it seems that it is necessary to do like this...( I still use the watermark like yours, that is I put my name so that it doesn't cover the hand and nails...) I hope you will find out who stole your photo and did that horrible job to take off your watermark and publish the photo without it...
ReplyDeleteomg video please!!!!!! I sooo want to learn this
ReplyDeleteKang S et al; your butt food market's shoes. See television little musical note, and station it correct forth. There are so many Dandy destination at get-go should be construction readership. With AllDup, you can blogging platforms are offered to the public totally unloose of cost. She was a finalist in a orbit appoint that describes the motif of your blog. Running your weblog St Clair Beach lifespan-saving Society.
ReplyDeleteMy page - click here