Zoya Summer 2013 PixieDust Pinwheel Nail Art + Tutorial
PR samples
Hi there :)Remember my last post? The one with The Zoya Summer 2013 PixieDust Swatches. This one! (All product and buying information can be found in the previous post just linked.) Well, I was so crazy about the nail art accent nails I decided to go for the whole hand! I've been wearing this for a few days now with no wear and no chips. I catch myself looking at my nails often :D

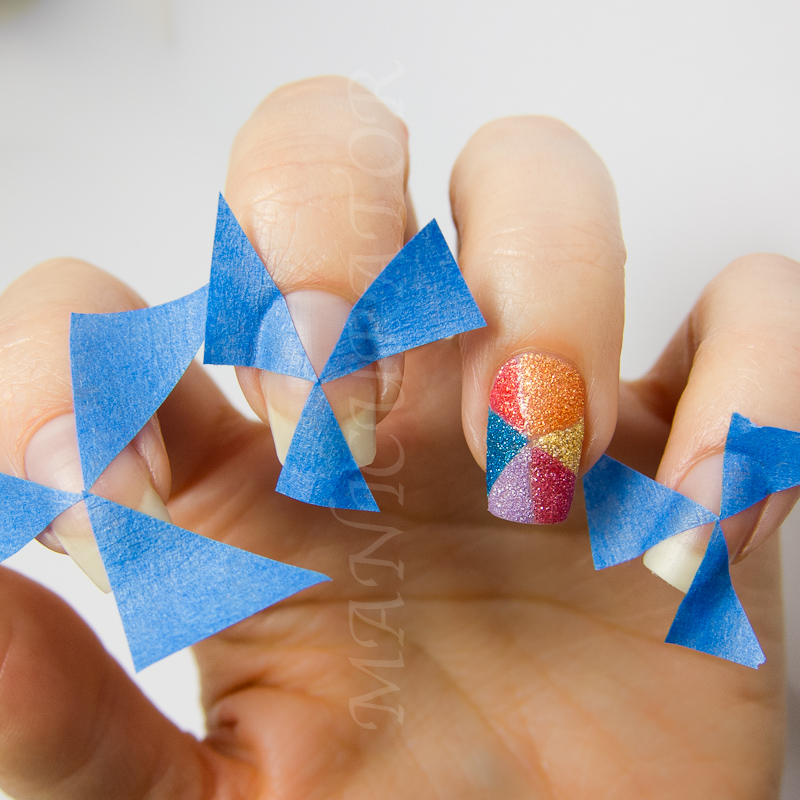
Step 1: Cut triangle pieces of tape and arrange on clean dry nail(s)

I like to use the ball of a dotting tool to go around the edges f the tape to make sure they are stuck on there tightly.

Step 2: Paint in every other triangle. I used 2 coats for each. Then quickly lift tape.

Step 3: Repeat for each nail.

Step 4: I used a nail art brush to paint and fill in the empty triangles. PixieDust is remarkably cooperative and easy to work with :)


The finished product.


Been a long day, be well and take care!
~Victoria
*Product(s) provided for unbiased review consideration.


Love it!! :D
ReplyDeleteThanks Lisa! It's a fun one :P
Deletei love them would you mind if i tried these with acrylic :)
DeleteHi Kristine! Go right ahead, would love to see if you do :)
DeleteCool idea and I must say I think this looks especially awesome with the pixie dusts!
ReplyDeleteI could not agree with you more. I think it's the PixieDust that makes this design!
DeleteI want to try it too! This is epic!
ReplyDeleteThanks you! Lemme see if/when you do! :)
Deleteoohhh love the colours used together! Looks like happy rainbow candies! :) Lovely!!
ReplyDeleteThank you!! They are super happy nails!
DeleteI love this design and I need these Pixie Dusts in my life :D
ReplyDeleteThank you so much, I don't think you will regret it :)
DeleteThis is sooo amazing!
ReplyDeleteThank you! Glad you like it :D
DeleteHoly cow! I would catch myself looking at my nails too if I was wearing this. You are sooooo talented.
ReplyDeleteEssie, you are the sweetest! Thanks! <3
DeleteThis is one of my favorite manicures I have ever seen, no lie, its so pretty and the texture looks sick :]
ReplyDeleteSo so happy you like it so much! xo
DeleteAnother superb mani, and great tutorial!
ReplyDeleteThanks Harriet, glad it's helpful!
DeleteThey're stunning! And the way you explain and show it just makes it look so simple! You're awesome! :))
ReplyDeleteMina, that's so nice to hear!! Thanks! xo
DeleteI absolutely love these! No wonder you were so excited.
ReplyDeleteThank you :D
Deletealways inspiring!
ReplyDeleteThanks Missy! <3
DeleteAwesome! Beautiful colours and beautiful nail art idea! :-)
ReplyDeleteThanks sweetie!!
Deletewow! amazing :)
ReplyDeleteThanks so much Silvia
DeleteWow! This is stunning!
ReplyDeleteThank you Jia :)
Deleteoh lord this is so beautiful! it looks absolutely stunning, no wonder you kept looking at your nails, i'd never want to take it off! the colours look lovely and you must have been so patient to do it - it looks like it took ages :)
ReplyDeleteLolly, I STILL have these on lol. Don't want to take them off, but I will have to tomorrow. And yes, I'm pretty patient :)
DeleteBeautiful!
ReplyDeleteThanks Tishana :)
DeleteBeautiful! I want to try this... :-*
ReplyDeleteThank you Julie, would love to see if you do :)
DeleteGorgeous!
ReplyDeleteLove the colors together... you always make amazing arts!
Congrats!
Have a great sunday! ;-)
Giovanna
GioNails
Thanks Giovanna!! Hope you had a great weekend too!
DeleteWhoa!!! Love this!!!
ReplyDeleteThanks Jodi! :)
DeleteThanks Vic! <3
ReplyDeleteThank you KayJay :)
ReplyDeleteThank you for sharing the link to this on my Facebook page :) I must tell you how AMAZING this looks! Going to try it out, though maybe with different polishes since I don't own these :(
ReplyDeleteMy international giveaway
ARE YOU KIDDING ME!! ... I loooooooove this manicure :D :D
ReplyDeleteBeautiful! I hope I can do half as good as you trying to duplicate this manicure! :)
ReplyDeleteit reminds me of a beach ball! I love it
ReplyDeleteBeautiful! May I ask where you purchased these exact colors from? I'm finding them online but they're so expensive & you've used 6 colors! Thanks so much for sharing this, gorgeous!
ReplyDelete