Jamberry plus Sonnetarium Lotta Zebra nail art
Hi there!! What a cool look I am showing you today, combining Jamberry Nails (find them on Facebook), black and white nail art plus a gorgeous Sonnetarium (Etsy shop) called Lotta Zebra. I WISH I could tell you that the Jamberry nail shields are great and I loved them...buuuuuut...I'm highly disappointed. First of all, in the sample that was sent, most of the sizes they sent are too small. I don't think I have abnormally large nails. But I made do, and got creative. As far as application, I followed the instructions exactly...but couldn't get either of them to lie perfectly flat. And FORGET about my Index finger. It's a disaster (hence I purposely left in blurry). I LOVE this look, but these are not for me. Hope you can get a better experience with these if you try them. They just didn't seem to mold around the curves of my nails...even though I heated it the way you are supposed to. I used Milani High Speed Fast Dry in Black Swift and Sally Hansen White on for the middle and pinky fingers.
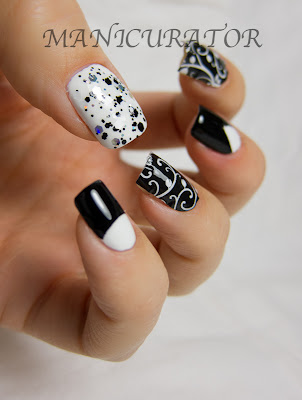


 This Sonnetarium however, is the bomb. It's awesome and I can't wait to try it over a colored base as it's in a clear base. The white glitters got lost on the white nail, but of course..I was going for a totally white/black look, so it worked for me here.


 A closeup so you can see how it buckles and doesn't lay flat on my curvy nail :(
Have you tried Jamberry? Any luck? I'm going to try this next time using the good old fashioned nail art method...with a nail art brush :P
So glad to have YOU reading :)
~Victoria
*Disclosure - some products in this post were sent for my honest opinion and review.


Have you tried Jamberry? Any luck? I'm going to try this next time using the good old fashioned nail art method...with a nail art brush :P
So glad to have YOU reading :)
~Victoria
*Disclosure - some products in this post were sent for my honest opinion and review.


This is a gorgeous mani! That's too bad about Jamberry, though. I have some shields to try out so I wonder how that will go... haha.
ReplyDeleteThanks! Yeah...I love their designs so I was sad it didn't fit on my nails. I will try one more time, but I have fairly curved nails..I suspect that is the problem.
DeleteI haven't tried Jamberry, but I've had similar results with other nail shields. I have fairly large nails, so I figured it was just me. I love the designs Jamberry has, so I was going to try them, but I think I'll skip it and hope another brand will do the trick. Thanks for the review!
ReplyDeleteYou're welcome...and good luck. If you find success..please let me know :)
DeleteExcellent review! I have a few different nail shields in my stash to try but in the past I have had no luck at all. My nails are very rounded and it is nearly impossible to apply a flat sticker to a rounded shape. (Try sticking tape on a ball.) My sewing experience tells me that you should cut notches in the the flat tape or shield to make it fit but that would distort the image. Oh well. Again thanks for the review.
ReplyDelete<3 Shannon
Thank you so much Shanon. Agree completely...it needs to have a way to be more elastic to wrap around the curves. I mean...nails have CURVES.
DeleteOops...I mean Shannon!
Deletenice combo :)
ReplyDeletevery awesome mani!! I have not tried the wraps ....I have very curvy nails :(
ReplyDeleteAw it's too bad they didn't work out well because they LOOK really cool. The rest of the mani is fab though :)
ReplyDeleteI love black and white designs =)
ReplyDeleteIt does look very nice. I've used another brand of nail "wraps" with no problems at all. And it lasted quite a while for me.
ReplyDeleteAre the Jamberry shields more like plastic than the Sally Hansen ones that are made of nail polish? Because I had a similar problem (though not to the same extent) with the Kiss Nails brand strips because they were like little layers of tape...sorta... :)
ReplyDeletethis would be great! if they worked properly.
ReplyDeleteDespite the nails shields not working this is a gorgeous mani!
ReplyDeleteThe mani here is very classy!!!! Even though the nail shields were problematic. I reviewed my sample of these a while back, and I had similar issues. It so didn't want to lay flat on my nail, I do have wide nails, and they lasted maybe a day :-( I thought I might not have applied them correctly, but I'm not sure...
ReplyDeleteJust a lurker here, I was Googling some nail images and your site popped up. After you initially place the Jamberry shield on, apply pressure at the base of your nail and heat it up REALLY well, and be careful, but you will be able to pull the shield and stretch it and it'll stretch those bubbles and ridges right out. Mine do the same thing if I don't pull on it a bit :) Good luck!
ReplyDeleteThis is a GORGEOUS mani. Have you tried the new formula that Jamberry came out with last spring? It's a lot thinner, more flexible, and more pliable than the old formula, so it requires MUCH less heat. Also, I'd love to troubleshoot how to apply them with super-curvy nails. I have some friends who have had luck with a few separate techniques. Please e-mail me, so I can help you!! We still have the black floral pattern, but also have over 400 others to choose from! Which sparks your creativity? :)
ReplyDeleteI just found this blog when looking for Jamberry pics at google. Even though this post is old, I just have to tell you that if you youtube "the baseball method for applying jamberry" you'll find the technique to applying jamberry on your curvy nails perfectly! My nails are even curvier than yours but I can get Jamberry on them easily and nicely.
ReplyDelete